


Introduction to How to Draw a Snake
If you have ever thought about how to draw a snake, you’re in the right place! Drawing snakes can be an interesting and satisfying artistic effort. In this thorough guide, we will walk you through the process of drawing a snake from scratch, providing you with step-by-step guidance, useful tips, and creative methods. Whether you are a beginner or an expert artist, this piece will help you unlock your artistic potential and create beautiful snake drawings. So grab your pencil, and let’s get started!
The Fascination with Snakes
Snakes have long fascinated artists and people alike due to their unique characteristics and symbols. They can be seen as both strange and fascinating creatures, making them interesting subjects for artists to catch on paper. The sleek and flowing body of a snake presents a fascinating task for artists, allowing them to explore different methods and styles. By learning how to draw a snake, you not only improve your artistic skills but also gain a greater respect for these amazing animals.

See also: How to Get Your Dog to Stop Digging: 12 Best Effective Ways
1. Why are snakes interesting to draw?
Snakes offer a wide range of options for artistic expression. From their complex scales and patterns to their expressive eyes and unique body shapes. Each snake presents a new artistic chance. Drawing Snakes allows artists to play with patterns, painting methods, and designs, eventually pushing the limits of their imagination. Moreover, snakes have a symbolic significance in various cultures, representing life, change, and knowledge. By catching their spirit on paper. you can evoke these strong ideas in your artwork.
Essential Materials for Drawing Snakes
Before getting into the drawing process, it is important to gather the necessary materials to ensure a smooth and enjoyable experience. Here are the key items you will need:
2. Pencils and Paper
Start by picking a set of quality drawing pencils that offer a range of lead strengths, such as 2H, HB, and 4B. These pencils will help you to make light and dark colors in your snake drawings. Additionally, pick a good paper for your artwork. A thicker paper weight, such as 140lb or higher, is suggested to avoid smudging and provide better support for coloring and mixing methods.

3. Erasers and Blending Tools
Having a good-quality pencil is important for fixing mistakes and improving your pictures. Invest in a kneaded eraser, as it can be shaped into different forms and offers exact removal. Additionally, try using mixing tools like tortillons, blending sticks, or even tissues to create smooth changes between shades and textures.
4. Reference Images
To ensure accuracy and depth in your snake drawings. Gather reference images of different snake species. These can be pictures or drawings that highlight different poses, designs, and textures. Studying these sources will help you understand the structure and unique features of snakes, allowing you to create more realistic and visually appealing pictures.
See also: How Fast Can a Bear Run: Top 12 Best Comprehensive Answers
Understanding Snake Anatomy
To draw a snake effectively. It’s important to have a general understanding of its shape. Let’s study the key parts of snake structure that you should keep in mind:
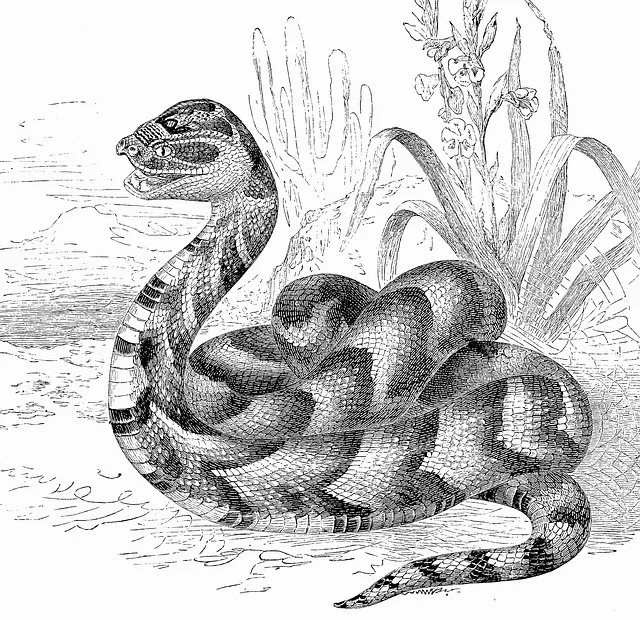
5. Head and Jaw Structure
Snakes have enlarged heads with different mouth systems. The head is often triangular or oval-shaped, narrowing towards the snout. Take note of the placement and shape of the eyes, lips, and forked tongue, as they add character and reality to your snake images.
6. Body Proportions
The body of a snake is long and thin. Have a bendable neck that allows them to move with ease. Familiarize yourself with the measurements of a snake’s body, including the thickness and length of the head. Understanding these measures will help you correctly show the snake’s form and create a sense of balance in your sketches.
7. Scales and Texture
Snakes possess unique scales that cover their bodies. These scales provide safety and add to the general structure of the snake’s skin. Pay close attention to the order and colors of the scales, as they change based on the species. Incorporating these features will add depth and reality to your snake drawings.
See also: Top 10 Best British Birds Of Prey 2023- Rabt Corners
Sketching the Basic Shape
Once you have a good grasp of snake structure, it’s time to start drawing the general shape of your snake. Follow these steps:
8. Drawing Basic Shapes
Begin by lightly outlining the snake’s body using simple shapes. Start with a circle or a slightly bent line to represent the head. Then, add several linked circles or ellipses to set the body’s length and shape. These basic forms serve as a framework for your drawing and help you set proportions.
9. Adding Curves and Contours
Next, adjust the shape of the snake’s body by adding curves and outlines. Snakes have a fluid and moving form, so use smooth lines to describe the shapes of their bodies. Pay attention to the narrowing of the body towards the tail and the minor bends along the length. Gradually improve the sketch by adding more detail to the head, neck, and tail.
See also: What Does Bear Poop Look Like: Unveiling 6 Best Secrets
Adding Details and Definition
With the general shape in place, it’s time to add features and clarity to your snake drawing. Follow these steps to improve the reality of your artwork:
10. Eyes, Nostrils, and Tongue
Focus on the head of the snake and carefully draw the eyes, mouth, and tongue. The eyes can change in shape and size based on the species, so look to your reference pictures for accuracy. Add depth to the eyes by coloring the area around them and making highlights to mimic the reflecting qualities of snake eyes. Include the airways as small holes on either side of the head and add a forked tongue for added realism.
11. Scales and Texture Details
Now, it’s time to handle the scales and structure of the snake’s body. Observe the reference pictures and duplicate the scale patterns by adding small, overlapped shapes along the body. Use a mix of light and dark colors to create depth and space. Consider using cross-hatching or stippling methods to mimic the appearance of snake scales. Be careful and take your time as you work on this detailed detail.
12. Incorporating Patterns and Colors
Snakes come in a variety of shapes and colors, making them highly fascinating. If you wish to imitate a specific snake species. Study its unique patterns and colors. Incorporate these patterns into your drawing, paying attention to the placement and arrangement of spots, lines, or geometric shapes. Use colored pencils or other coloring tools to bring your snake to life, carefully adding the colors to achieve a lifelike effect.
See also: How to Give a Cat Liquid Medicine: Top 9 Effective Steps
Shading and Highlights
Shading plays a crucial role in creating depth and three-dimensionality in your snake drawings. Follow these steps to successfully shade your artwork:
13. Creating Realistic Shadows
Identify the main light source in your drawing and decide where the shadows would fall. Use a mix of hatching, cross-hatching, or stippling methods to shade the parts that are away from the light source. Pay attention to the outlines and curves of the snake’s body, allowing the shadows to enhance its form. Gradually build up the shading, adding darker values to create contrast and depth.
14. Highlighting for Depth and Dimension
In addition to coloring, highlights play a crucial role in making your snake drawing look more realistic. Identify the places that would catch the light and add highlights properly. Use an eraser or a mixing tool to lift or lighten the graphite or colored pencil, making minor highlights. This method adds depth and volume to your snake drawing, making it appear more real.
See also: Why Does My Rooster Crow All Day: Top 7 Best Reasons to Help
Enhancing Realism with Texture
To truly capture the feel of snakeskin and improve the reality of your drawing, try adding these techniques:
15. Mimicking Snake Skin
Snakeskin has a particular texture that can be duplicated using special drawing methods. One successful way is to use several small, bent lines to mimic the scales. These lines should follow the curves of the snake’s body and cross slightly to create a realistic look. Vary the length and thickness of the lines to mimic the flaws found in snakeskin.
16. Creating Depth with Texture
To add depth and volume to your snake drawing. Try different coloring methods. Consider using cross-hatching, where you draw overlapping lines, or stippling, where you create depth with small dots. These methods can be applied carefully to areas that require extra depth, such as shadows or areas with noticeable scales. Take your time to add the images gradually, building up the desired result.
See also: How to Cut Cat Nails: Best 7 Steps for A Comprehensive Guide
Tips and Tricks for Realistic Snakes Drawing
To further improve your snake drawings and unlock your creative potential, consider these helpful tips and tricks:
17. Capturing Snakes in Motion
Snakes are often portrayed in coiled or twisted poses, showing their flexibility and speed. Experiment with drawing snakes in different poses to express a sense of motion. Study reference pictures or watch real snakes to understand their natural poses. Adding lively poses to your snake pictures will make them more interesting and visually appealing.
18. Experimenting with Different Snake Species
Expand your creative skills by drawing different snake types. Different snakes have unique designs, colors, and body forms. Challenge yourself by studying the variety of snakes and adding these unique features to your artwork. By playing with different species. You can broaden your artistic skills and discover new techniques.
19. Creating Dynamic Compositions
Think beyond the single snake and consider adding other elements to your design. Snakes can connect with their surroundings. Such as by moving through plants or coiling around trees. Experiment with different layouts and backgrounds to add visual interest and tell a more engaging story through your artwork.
See also: Why Did Rooster Leave the Ranch: 15 Best Reasons For Help
FAQs on How to Draw a Snake
Here are some of the most important frequently asked questions

Q1. Can I use colored pencils for my snake drawings?
A1: Absolutely! Colored pencils are a popular choice for adding bright colors and detailed details to snake drawings. They allow you to mix colors, make smooth changes, and catch the unique designs of different snake species.
Q2. How can I make my snake drawing look more three-dimensional?
A2: To give your snake drawing a three-dimensional appearance, focus on coloring and highlights. Use varying degrees of pressure and different pencil grades to create depth and volume. Have essential materials for drawing snakes. Pay attention to the light source and how it affects the shadows and highlights on the snake’s body.
Q3. What are some common mistakes to avoid when drawing snakes?
A3: Some common mistakes to avoid when drawing snakes include failing to study their anatomy, incorrectly showing scales and texture, and missing the importance of lighting and shadows. Take your time, study reference pictures, and practice regularly to improve your snake drawing skills.
Q4. Can I draw a snake without any previous drawing experience?
A4: Yes, you can! Drawing a snake is an excellent chance for newbies to improve their drawing skills. Start with simple forms and gradually build up the features and backgrounds. With practice and care, you’ll see changes in your snake drawings over time.
Q5. How long does it take to become skilled at drawing snakes?
A5: Understanding snake anatomy is important. Becoming skilled at drawing snakes, like any skill, changes from person to person. It depends on things such as the amount of time committed to practice, the number of practice sessions, and individual learning skills. With constant practice and a focus on growth, you can see progress in your snake drawings within a few weeks or months.
Q6. Are there any online lessons or courses I can take to improve my snake drawing skills?
A6: Yes, there are numerous online lessons, courses, and tools available to help you improve your snake drawing skills. Websites like YouTube and art learning platforms offer step-by-step lessons, demos, and classes specially tailored to drawing snakes. Explore these tools to find lessons that fit your learning style and level of experience.
Conclusion on How to Draw a Snake
To answer “How to Draw a Snake”. Overall, drawing a snake may seem difficult at first, but with the right skills and practice, you can create beautiful and realistic snake drawings. By knowing snake structure, using the right materials, and paying attention to details like scales, texture, and coloring, you can bring these fascinating creatures to life on paper. Remember to explore, study reference pictures, and accept your artistic style as you start on your snake drawing path. So grab your pencils and let your creativity snake its way onto the paper!
For more details about the articles: Click Here
Amazing article both covering drawing and anatomy of snakes
Nice article covering both drawing and anatomy of snakes.
Thanks for motivating our team
Appreciated